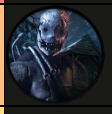
A Comprehensive Guide to T-Bagging in Dead By Daylight
Hello to the survivors in the fog, whether you are a SOLOQ specialist or SWF player. Today, I am writing a tutorial on how to t-bag as a survivor properly in Dead by Daylight without ending as a video with “Karma” tag on Reddit.
A bit of introduction about myself: I am a try-hard survivor main who primarily plays SWF in high MMR games (according to the database). I sincerely enjoy playing DBD to the point where I went to work for BHVR (not anymore) to fix a bug related to Dead Hard activation timing. Anyway, that’s about me, now let’s talk about t-bagging.
Crouch Keybind (PC only):

Using the default “crouch” key is a common mistake that I see often among the t-bag newbies. I dislike the design decision of binding the crouch key to “Ctrl” in action-heavy games.

WHY? You may ask. This is because in Dead By Daylight, the “sprint” key SHIFT is next to the “crouch” key CTRL. You want the maximum control over your character’s movement, which means your ring, middle, and index fingers should be placed on “AWD” the majority of the time. This left us only the pinky finger to control both the SHIFT key and CTRL key, which is awful.

Consider the scenario where you are looping a Nemesis (or Huntress, Trickster) in a loop with a safe pallet. The Nemesis can try to cheese you by pulling up his tentacle mid-chase, and you would naturally try to dodge it by pressing the crouch key. During the time when you switch your pinky finger from “SHIFT” to “CTRL”, your character starts walking instead of sprinting, which means you lose some distance. However, if you bind the “crouch” key to other keys that your thumb can control(for example, “C”), then you don’t have to interrupt the pinky finger and result in no distance loss due to mechanical issues. The same concept goes to “E” when activating Dead Hard, I binded it to the mousewheel for the minimum mechanical delay.
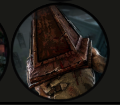
T-Bag position

First of all, you want to find the best position for t-bagging. Any enclosed red area is NOT a safe place to t-bag. The killers can have NOED and hit you from the left/right sides, causing your character to fall onto the sideway instead of forward, and being picked up before can crawl out. One way to prevent this is to use gesture animation to cancel the ragdoll effect, but it requires precise timing.
The enclosed green area is the recommended t-bag area as none of the things above can happen to you. The purple circle is the best position to t-bag as the pillars limit the space where your character can fall on the ground.
WARNING: Some maps’ escaping lines are 1–2 meters behind the pillars, for example, the RPD and Dead Dwag. The pillar is not always a reliable way to estimate the green line.

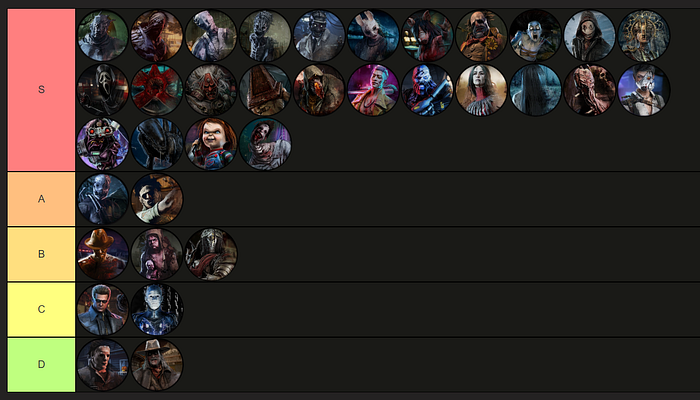
T-Baggable Killer Tier List
Now I am going to introduce my personal t-baggable killer tier list with S being the easiest and the safest for survivors.
The Trapper: A tier
Tiny risk. Just pay attention to the trap near the exit gate, then you are good. However, many Trapper players like bringing No Way Out + Blood Warden + NOED, so watch out if The Trapper is trying to kill time with a down teammate after the EGT has started.

The Wraith: S tier
No risk. Just watch out for his body block + NOED.
The Hillbilly: S tier
No risk.
The Nurse: S tier
No risk.

The Shape: D tier
DO NOT, I REPEAT, DO NOT T-BAG MICHAEL MYER. If Michael Myer has a tombstone, then you will instantly get murdered on the spot. Many Michael Myer will bring Play With Your Food to suppress the “moriable open left hand”. There’s no reliable way to tell if the killer has a tombstone addon.


The Hag: S Tier
No risk, as proven by Mathieu (YouTube link).
Note: Mathieu is a wholesome person in real life, but the clip is just too funny.

The Doctor: S tier
No risk, but watch out for NOED.

The Huntress: S tier
No risk, but watch out for Iridescent Head.

The Cannibal: A tier
Tiny risk. Same as The Trapper, watch out for the Blood Warden + NOED.

The Nightmare: B tier
Moderate risk. Freddy has an iridescent addon: Black Box that can block the exit gate for 15s after opening the exit gate. The killer itself also comes with the perk Blood Warden. Otherwise, you are good to t-bag.
The Pig: S tier
No risk as long as your Reverse Bear Trap is NOT activated.

The Clown: S tier
No risk.
The Spirit: S tier
No risk.

The Legion: S tier
No risk.

The Plaque: S tier
No risk.

The Ghostface: S tier
No risk. But if you get caught, he will t-bag you instead.
The Demogorgon: S tier
No risk.

The Oni: S tier
No risk.

The Deathslinger: D tier
I do not recommend t-bagging The Deathslinger unless you absolutely know what you are doing. A good Deathslinger player with NOED, Iridescent Coin (apply exposed status), Prison Chain (increase breaking chain time), Bayshore’s Cigar+Warden’s Keys (reduce reloading time) CAN AND WILL pull your character far away from the exit gate before he can hit you again. You are not safe from a good deathslinger player even if you are healthy. I will just escape as far as I can if I am not sure about his perks/addons.
The Executioner: A tier
Tiny risk. Pyramid head’s range attack may cause the survivor to fall down toward unexpected direction.

The Blight: S tier
No risk.

The Twin: B tier
You can not escape if the Victor is on your head, which can lead to some funny things. Certain add-ons can increase the time required to get rid of the Victor, so watch out.

The Trickster: A tier
Tiny risk. If a survivor goes down due to the blade damage, the player model WILL NOT lean forward but rather perform the dying animation that would take around 2 seconds to complete. Just pay attention to your laceration meter in case going down by accident.

The Nemesis: S tier
No risk.

The Cenobite: C tier
The survivors bounded by chains can not escape, and The Exit-Gate-Blocker lingers for 5 seconds after the Chains are removed. If The Cenobite has STBFL, then you are doomed. It sounds easy on paper, but I have died to this killer quite many times due to t-bagging and getting chained to death. Watch out!

The Artist: S tier
No risk.

The Onryo: S tier
No risk.
The Dredge: S tier
No risk.

The Mastermind: B-C tier
Wesker can grab the survivor directly if: the survivor is injured OR the survivor is infected. In addition, a good Wesker player can choose to throw the survivors away from the exit gate by using some sexy Wesker daddy tech. The proper way to t-bag Wesker is by staying healthy AND not infected. After he grabs you with the ability for the first time, the exit gate will be temporarily blocked. Do not panic, the exit gate will unblock itself before Wesker can recover from his power again. Stay calm and walk to the purple circle area, and hold W, then you are good to go.
The Knight: B tier
The Knight has a Iridescent Company Banner that can block the exit gate for the hunted player during the duration of hunting. If The Knight manages to do a double hit within that period, then you will most likely die for sure.

The Skullmerchant: S tier
No risk, and you should t-bag harder.

The Singularity: S tier
No risk.

The Xenomorph: S tier
No risk.

The Good Guy: S tier
No risk.

The Unknown: S tier
No risk.
Finally happy t-bagging by crouch, crouch, crouch, crouch, crouch!!!
Some quick Q&A:
Q: Do you t-bag every killer in every game?
A: No! I don’t t-bag the killers who try to win the game with skills except 3-gen players. I don’t mind people who tunnel, slug, or camp because those are valid strategies that are necessary in some cases, and so does 3-gen. But playing against 3-gen players is just miserable and they deserve some good t-bags.
